
Before you do this, you have to make sure this doesn't change (significantly) the fit of your garment! Some gathers are there not only as decorative details but as an essential detail for proper fit. In case of the latter, you can't just eliminate them, you have to go with them or transform them to pleats (but that's another topic).

My tutorial is based on Burda Style pattern #116A from the 03/2017 issue, but any gather can be eliminated in a similar pattern. Remember to take a close look at the pattern pieces and take into account them being on a fold or a full piece, etc...
The pattern has a pleat and gathers on the front pieces as well as a pleat and gathers on each sleeve. And I got rid of both. I did see that eliminating them from the front piece was not a good idea as it took away some fitting ease in the bust area, so I don't recommend you do it for this blouse but I show the steps here anyway for educational value. 😄
I started by eliminating the gathers on the front piece:
Note: All measurements I give color are measured between the two arrows of that color on the pattern piece, those with letters are calculated.
1- Measure the length of the top line of the front pattern piece (red), then measure the pleat width (purple). The length of this line after you fold the pleat becomes
X=red - purple

2- Measure the bottom length of the front neckband from centre front to notch/mark 6 (blue). The front piece will be attached between the two 6s after cutting on the fold.

3- Now we need to reduce X to be equal to blue.
Calculate Y= X - blue, this is how much we need to get rid of.
4- Find the middle point between gather marks (we'll call it A), hold your ruler perpendicular to the top front line and mark a dot (we'll call it B) at the bottom line of the pattern piece (you can of course draw that line too if you want). Marked green.

5- Measure Y/2 on each side of A and set marks c1 & c2.

6- Draw a line from c1 to B and another from c2 to B (drawn in brown below). Make sure both line are the same length, adjust the position of B if they're not.

7- Now cut along one of the lines from top to almost bottom of the pattern, then drag this line over to the other one until they're lying on top of each other and tape in place.

You have now eliminated the gathering! 😄
Now the sleeves:
The way the pattern pieces here meet is a bit special, so extra measurements are needed.

1- Measure red and purple and calculate X= red - purple.

2- Measure blue.

3- Measure turquoise on the front pattern piece.

4- Calculate Y= X - blue - turquoise.
5- Mark c1 at each pleat mark & c2 a distance Y/2 away from c1 on both sides.

6- Mark A in the middle between c1 & c2 on both sides. And mark B as for front piece.
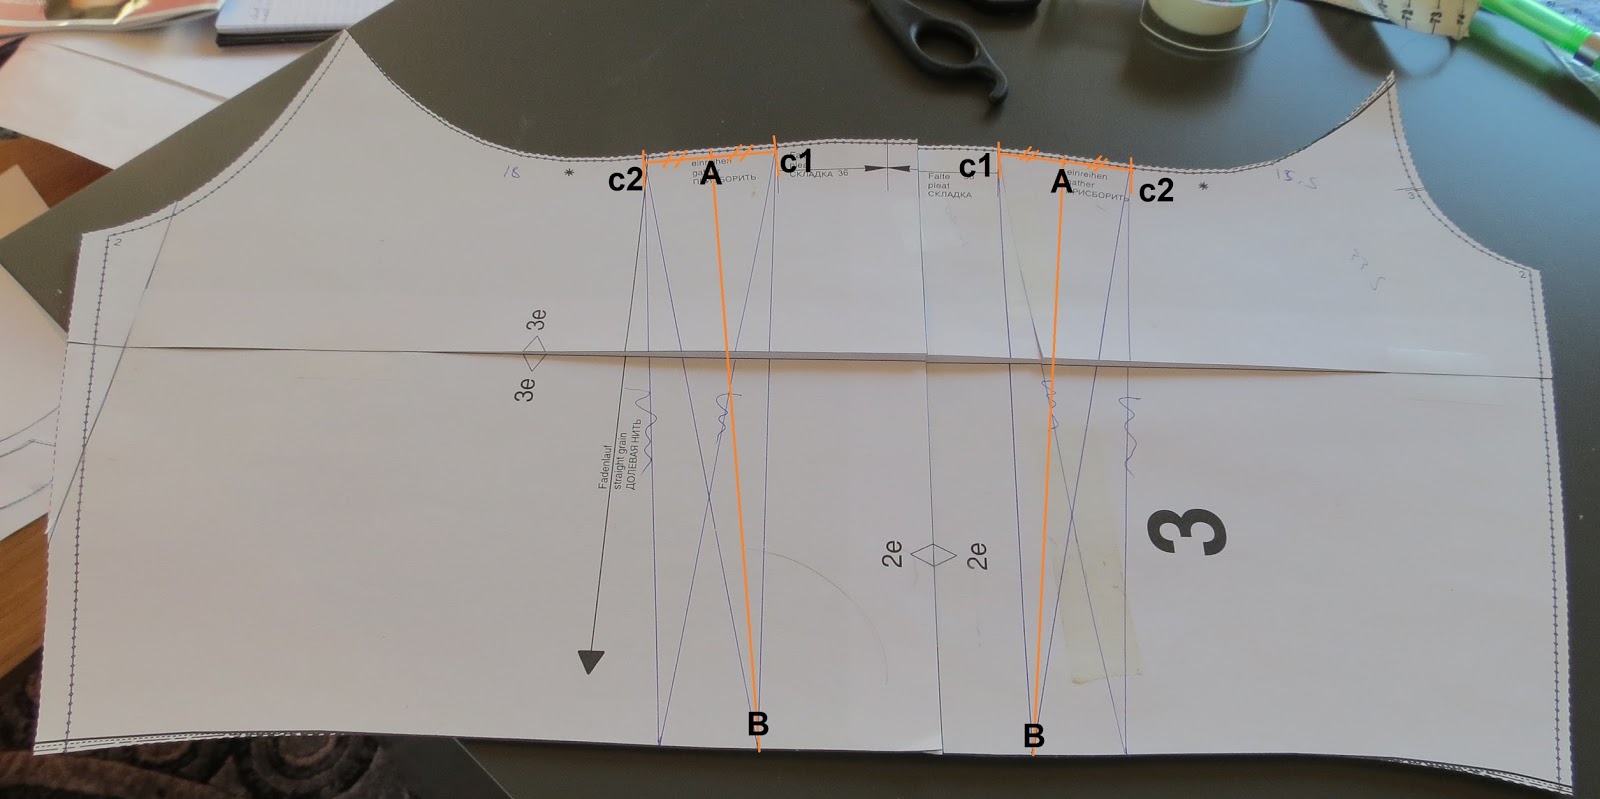
7- Draw the brown lines from c1 to B and c2 to B as for front piece. Make sure both line are the same length, adjust the position of B if they're not.

8- Cut along the lines from c1 to almost B, slide the c1-B line until it lies exactly on top of c2-B line on both sides and tape in place.

Gathers are now also eliminated on the sleeves!
Now it's just to follow the pattern instructions but ignore any that have to do with gathering.
Did you find this useful? Do you have questions? I'd love to hear from you so feel free to leave me a comment and I'll get back to you soon 😃.
Very cute blouse, Maria! It looks lovely on you. I am interested in that pattern and would love to make mine like yours. Thank you for sharing the details.
ReplyDeleteThank you so much Eli! I'd love to see what you make of this pattern!
DeleteHope the details were actually helpful :)
Very cute blouse, Maria! It looks lovely on you. I am interested in that pattern and would love to make mine like yours. Thank you for sharing the details.
ReplyDelete